What is "DPI"?
DPI stands for dots per inch - the number of pixels present in each inch of a photo file. The higher the DPI, the clearer the printed image, the lower the DPI, the more pixelated (or "blurry") the image will print at larger sizes. We recommend that files be sized to 300 DPI for the highest quality print. Anything below 300 DPI may result in a loss in quality, and sometimes pixelation in the final printed product depending on how large the print is.
Photos from an iPhone/Phone or photos from online sources like Facebook or Instagram are usually 72 DPI, sized for the web rather than printing. An image sized to 72 DPI is great for viewing on a screen but is not ideal for printing, and it is a low-res image. Not sure if your images are low-res? Our editor will give you a low-res warning for anything below 150 DPI!
Our team has compiled two easy ways to change the DPI of your image, see below.
______________________________________________________________________
Using Preview on a Mac
- Open your file or files in Preview
- Click TOOLS > ADJUST SIZE. You should see a few different numbers, Like the Width, Height, and Resolution of your image
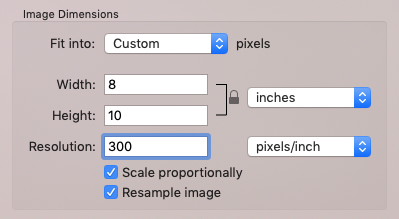
- Uncheck the “Resample Image” checkbox. Type 300 into the Resolution box. This will change the inches in Width and Height automatically to how large your photo can print when set to 300 DPI. Keep in mind that anything under 300 DPI (like 72 DPI for example) may not print at the highest quality
- Click “OK”
- Click FILE > SAVE
Your image is now resized to 300 DPI, the best resolution for printing! To make this change on more than one file at a time, simply open all of the files into preview at once, and select all of the images (on the lefthand side) once they are opened in preview. Complete the steps above and click save.
Tip: Want to make sure the DPI has been changed? Open the new photo file in Preview, and select "Tools" and "Image Size" in the top menu bar. The Image Dimensions should be 300 in the Resolution box, when set to pixels/inch.
The remaining width/height of your image is how large the image will print at the highest quality! For example, this image will print great up to 8x10 inches. If you are printing a print or page that is larger than 8 x 10, we recommend increasing the width and height of your image to match as well as having a DPI of 300:

______________________________________________________________________
Using Photoshop
- Open your file in Photoshop
- Click IMAGE > IMAGE SIZE. You should see a few different numbers, Like the Width, Height, and Resolution of your image
- Uncheck the “Resample” checkbox. Type 300 into the Resolution box. This will change the inches in Width and Height automatically to how large your photo can print when set to 300 DPI. Keep in mind that anything under 300 DPI (like 72 DPI for example) may not print at the highest quality
- Click “OK”
- Click FILE > SAVE
Your image is now resized to 300 DPI, the best resolution for printing!
Tip: Want to make sure the DPI has been changed? Open the new photo file in Preview, and select "Tools" and "Image Size" in the top menu bar. The Image Dimensions should be 300 in the Resolution box, when set to pixels/inch.
The remaining width/height of your image is how large the image will print at the highest quality! For example, this image will print great up to 8x10 inches: